- Loading...
Tools are a big part of being a productive developer on OpenJFX and we aim to provide excellent support for all three major IDEs: NetBeans, IntelliJ IDEA, and Eclipse. Regardless of which development environment you prefer, you should find it easy to get up and running with OpenJFX. We hope you will return the favor by submitting patches and bug reports!
This section assumes that you have already succeeded in Building OpenJFX. A gradle build must complete before IDE support will fully work (otherwise your IDE will just be a glorified text editor with lots of red squiggles!). Specific instructions for using each IDE is provided below, followed by a discussion on Developer Workflow, Using Mercurial, and Communication with other members of the team. Further information on how we work can be found under Code Style Rules.
IDE Pre-Requirements
Despite the fact that most of the major IDE's support gradle directly, we have decided to provide pre-generated IDE configuration files in order to make using an IDE smooth and painless. As the IDE's support for gradle improves, we may be able to update these instructions to rely on that support instead of the checked-in project files that we have today.
IMPORTANT: Ensure that you do not have gradle plugins for NetBeans or Eclipse (for Eclipse specific gradle configuration, see below) installed. They will conflict with the pre-generated IDE files. In the future, we may move to gradle builds within the IDE's as support becomes better.
Get a build of the latest JDK
You should use the latest OpenJDK when developing OpenJFX as OpenJFX continuously bumps the minimum JDK version. You can use the latest stable version or early access builds which can be found on http://jdk.java.net/12/ (replace the number for later versions). Starting from JDK11, JavaFX/OpenJFX is not included in the JDK anymore.
If you are building and running native libraries, you need to make sure you use the same version of JDK for NetBeans that you use to build JavaFX with gradle. In particular, if you try to mix a 32-bit JDK and a 64-bit JDK, the binaries will fail to load.
Get an IDE that supports the latest JDK
JDK9 brought modularization to the platform (including OpenJFX) and JDK10 brought Local-Variable Type Inference (AKA "var"). Later versions will bring more language changes. All these require IDE support, which means that you should always use the latest IDE versions, even early access builds. Not all IDEs will be able to advance equally in their support (some still have bugs with lambdas from JDK8), so keep in mind that there will be bugs. You are encouraged to work with your IDE's development team to resolve these.
NetBeans: https://netbeans.org/downloads/
IntelliJ: http://www.jetbrains.com/idea/download/
Eclipse: http://download.eclipse.org/eclipse/downloads/
Once you have downloaded and installed an IDE, you will need to configure it to the latest JDK version. This will be explained later on for each particular IDE. If you use an IDE without current support, OpenJFX will not compile and you will not be able to run from within the IDE.
JDK-8 Only: Delete jfxrt.jar (or move it to a different directory)
JavaFX is bundled with the JDK as an extension. The jfxrt.jar is located in the extension directory called 'ext' where Java is installed. You must remove it from this directory for the IDE's to work properly. The issue is this: If jfxrt.jar is in the extension directory, it will get seen before the code in your IDE. This means you won't be running or testing the code in your IDE. For more information on why this is a problem, see Unique Challenges of Working on the JDK.
By moving jfxrt.jar to a standard cache directory, your IDE can reference it to find binary versions of classes that are not yet open source. Further, when both jfxrt.jar and your IDE reference a class, the class from the IDE will be chosen.
IMPORTANT: Do not skip this step. If you do, you will not be running the code in your IDE and will waste hours wondering why you make changes and they don't run.
Using NetBeans (JDK-8)
Many commiters are using NetBeans to develop Java and native code. NetBeans projects have been configured for both. Native projects in NetBeans are currently not configured to build using either Make or gradle, however ant build works in NetBeans and will build the classes and jar files needed for the IDE.
Here are the steps to use NetBeans:
- Edit netbeans.conf
- Invoke NetBeans
- Add the JDK8 Platform
- Import NetBeans projects
- Rebuild
- Run sample code
- Run sample code with grade built shared libraries
Invoke NetBeans
Note that before you invoke NetBeans, you may need to clear your old defaults and start with a fresh NetBeans install or you might get errors.
Add the JDK8 Platform
Invoke Tools->Java Platforms
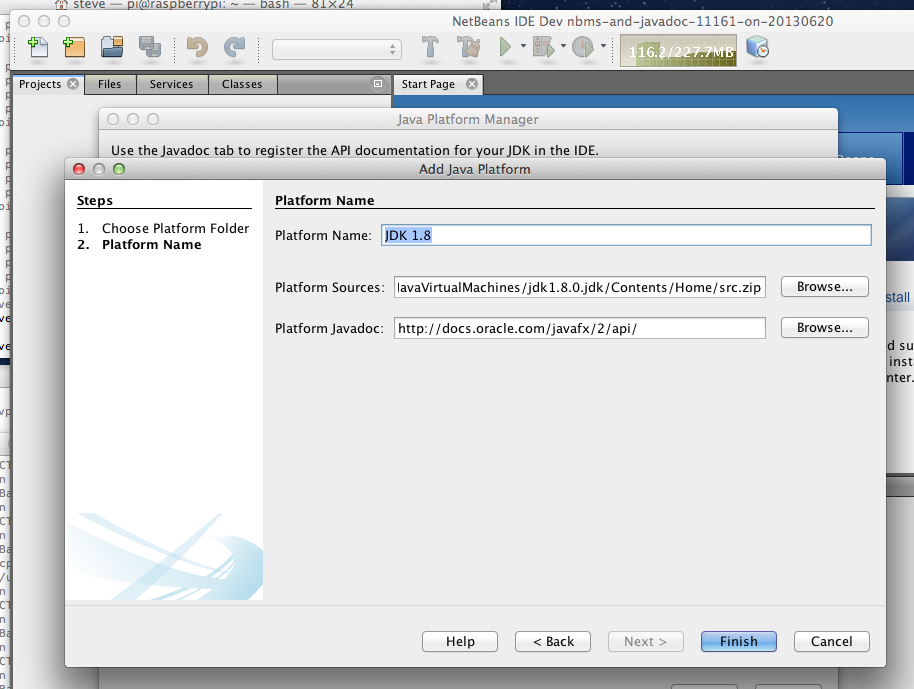
NOTE: You must add a new platform named "JDK 1.8" even if you already have your default platform pointing to a JDK 8 platform.
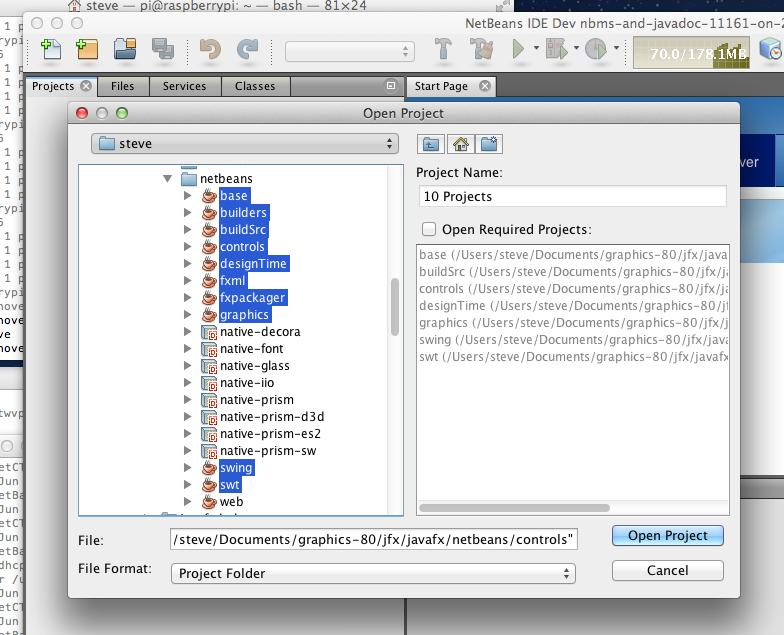
Import the NetBeans Projects
Open Project... (you may need to resolve missing junit jars, don't open web or builders for now)
Rebuild
Select one of the projects to build (controls or web is a good choice depending on what you want to debug). This might take a long time depending on how fast your machine it. There should be no red marks on any of the projects.
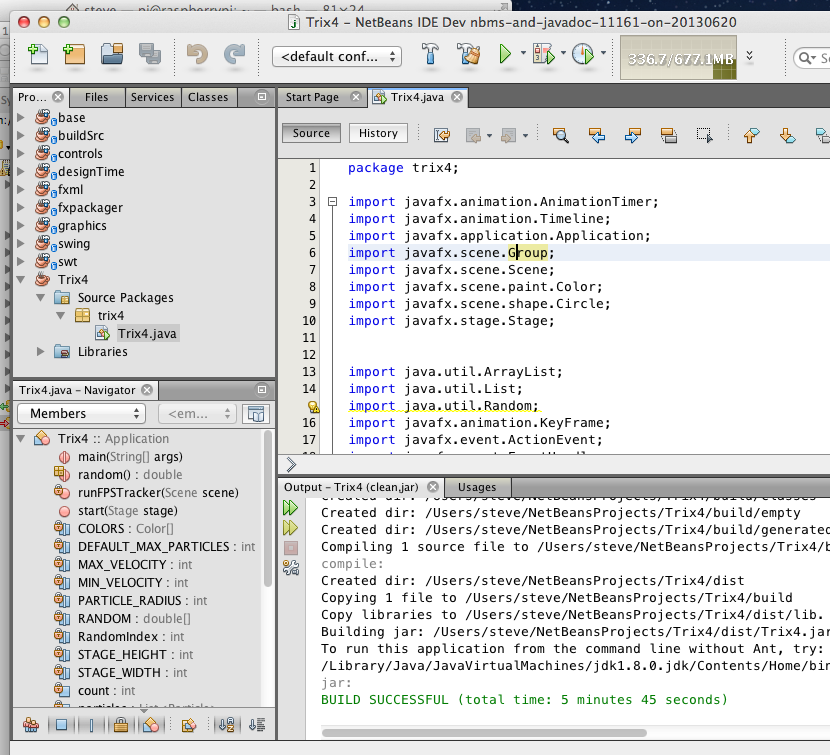
Run Sample Code
Here is some sample code that was hooked up to use the base, graphics and controls projects. When saved, these projects were built by the IDE and the same code executed using the source in the IDE.
Run Sample Code with gradle built shared libraries
//TODO - explain how to hook up the shared libraries in the run dialog
Using IntelliJ IDEA
IntelliJ is a popular IDE that is used by many committers to develop JavaFX code. An IntelliJ project has been created for you that you need to open. The steps to use IntelliJ are:
Open the IntelliJ Project
Make
Run sample code
Run sample code with grade built shared libraries
Open the IntelliJ Project

IMPORTANT: Open IntelliJ on the 'rt' directory exactly as indicated in the image above.
Make
Build->Make Project

Run Sample Code

Run Sample Code with Gradle Built Shared Libraries
//TODO - explain how to hook up the shared libraries in the run dialog
Using Eclipse
Eclipse is a popular IDE that is used by many committers to develop Java code. Eclipse project files and Buildship files (.project, .classpath, and files in the .settings folder) and have been created and checked into the repository. You should use the latest Eclipse version, or at least a version that supports JDK N-1 (for OpenJFX N) after patching (see below on patching).
OpenJFX is built using Gradle, which uses the javac compiler (even when run through Eclipse), and uses the Gradle wrapper to specify its current version. Various tasks, such as testing, are also configured through Gradle. However, you can still use Eclipse's compiler (ECJ) to take advantage of its speed as an incremental compiler, and of Eclipse's faster unit tests runner. Gradle is mandatory for the following phases:
- The initial setup (./
gradlewor /.gradlew build) that generates resources that are needed for the build. - Verify that the build task is successful with javac (because Eclipse's compiler can give different results sometimes).
- Running tests in the cases where Eclipse isn't configured to run them, or when the different compilers produce different results.
You can either use Gradle from the command line or through Buildship, which integrates Gradle into Eclipse (see below for more info on Buildship).
Import the Eclipse Projects
- Go to
File → Import → General → Existing Projects into Workspace. - Set the root directory to the base repository path (named "jfx" be default).
- Check
Search for nested projects. - It's recommended to import all the projects, however, you can select only the ones you know that you will need.
- Click
Finish

Organizing the Workspace
OpenJFX contains a large number of projects, which can make it difficult to work with as most of them will not be used regularly. Eclipse's Project Explorer view will show the projects' hierarchy:

You can use this view to collapse the non-relevant projects. If you prefer to use the Package Explorer view, you can use Working sets to only show those you are interested in. For example, you can create a working set for the projects under "apps", another for those under "modules", and another for those under "tests".
You can also close projects, which can reduce some visual clutter and will save time when building, but you will have to make sure that there are no errors on any project before integrating a PR. If you know that some projects can't be affected by the area you work on, you can close them.
Using Buildship
Buildship is an optional plugin that integrates Gradle into Eclipse, allowing you to forgo the command line. If you choose to use Buildship, use the latest version, as the Gradle version used in OpenJFX updates from time to time and Buildship needs to support that Gradle version. As mentioned above, the Buildship files that are required for the projects' configuration are included in the repository.
The Gradle Tasks view will list all the tasks that are configured in OpenJFX.

Not all Java projects are also Gradle projects. The root project ("jfx") is a Gradle project that configures some other child non-Gradle project (like the "base" project under "modules"). Some projects (like those under "tests/manual") are neither Gradle projects themselves, nor are they configured by the root project. There are 3 projects under "apps/samples" that are Gradle project themselves, but they do not function as such currently.
NOTE: Refreshing a Gradle project through Right Click → Gradle → Refresh Gradle Project will override the projects' Eclipse configuration files that come with the repository, and will cause them to not work anymore. This is because Gradle/Buildship does not know yet how to create the correct configuration files by itself. If you refresh a project by mistake, since we are using a git repository, we can revert the breaking changes. This is also the reason for not importing the projects as Gradle projects. It is safe to refresh tasks in the Gradle Tasks view.
Using EGit (TODO this section)
It's recommended that location of the local git repository not be inside the Eclipse workspace directory.
Configure Eclipse to use the latest JDK
- Go to
Window → Preferences → Java → Installed JREsandAdd → Standard VMand point to the latest version. If you want to find a regression or backport, you can switch to earlier versions underInstalled JREs(will require rebuilding). You might see a warning that Eclipse does not support this Java version, this should not cause issues. - Go to
Window → Preferences → Java → Compilerand set the compiler compliance level to the latest. You might not have an option for an unreleased version of Java. For example, if compliance level 11 is not available, install the patch from the update site: http://download.eclipse.org/eclipse/updates/4.9-P-builds/. Similarly, for Java 13 use: https://download.eclipse.org/eclipse/updates/4.13-P-builds.

Building the workspace can take some time. However, thanks to Eclipse's incremental compiler, you do not need to rebuild all of it on every change.
Running Applications and JUnit tests
Eclipse can run the applications in the repository (under "apps" and "tests") regardless of Gradle. You will need to add the following VM arguments to the launch configuration:
-Djava.library.path="<path to repo>\modules\javafx.graphics\build\module-lib"
--add-modules=javafx.controls (or other modules that are required, like "fxml").
JUnit tests can also be run as an alternative to the Gradle tasks. Right click on the resource you want to test (project/package/class) and select Run as → JUnit Test. You might need to add the following VM arguments:
-Djava.library.path="<path to repo>\modules\javafx.graphics\build\module-lib"
-Djavafx.toolkit=test.com.sun.javafx.pgstub.StubToolkit
When running test.javafx.scene.web.WebViewTest, use instead:
-Djava.library.path=<path to repo>/modules/javafx.graphics/build/module-lib:<path to repo>/modules/javafx.web/build/module-lib
Running a dependent project
Having an external project that uses the development OpenJFX modules is useful for debugging and testing.
Create a new Java project and add a module-info.java that requires the needed modules. For example:
In the project properties, go to Java Build Path → Modulepath and add the required projects.
If when running you receive warnings about missing packages or modules, edit the run configuration by going to its Dependencies → Override Dependencies, then delete the launch dependencies and Override.
If when running you receive an error like:
Graphics Device initialization failed for : d3d, sw
Error initializing QuantumRenderer: no suitable pipeline found
Then add -Djava.library.path="<path to repo>\rt\modules\javafx.graphics\build\module-lib" to the VM arguments in the launch configuration.
Overview
Content Tools